I don’t think I have a very wild life, but I do have a wild mind. A few years ago, I was fortunate enough to be allowed to create a hands-on maker space in my school called the Wonder Lab. It is a place where elementary students come to work on independent projects and make stuff out of recycled materials. It has been my dream to be able to create this space.
Now that we are remote learning, the Wonder Lab lies dormant, but my mind is still wildly imagining. I’ve created lots of Wonder Lab ideas for remote learning these past 3 months. This weekend, I tried my hand at building a cereal box vehicle from an idea I got from this Ultra Creative – General Mills video.
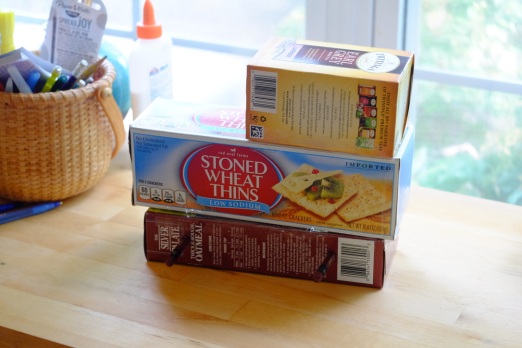
Step 1: Okay, so what if you don’t have a cereal box? Use what you have!

I used 4 small boxes:
1 cracker box
2 tea boxes (1 tea box is inside the cracker box).
1 oatmeal box (cut in half and slid together so it is the same width of the cracker box).
I stacked the boxes on top of each other and taped them together with clear tape. I made a basic truck shape.
Step 2: Building my Monster Truck
I needed axels for the wheels. I didn’t have any wooden dowels, so I used 2 unsharpened pencils. I punched holes with a sharp pencil. I made sure they were in the place I wanted them to be before I punched through to the other side.
Step 3: WHEELS!

I needed wheels! And it’s a good thing that my husband likes to eat a lot of oatmeal. I had an empty container of oat and grits. I took the tops off and had 2 wheels.
But wait! Don’t truck have 4 wheels. I cut the bottoms off both containers and made another 2 wheels. 2+2=4 wheels!
Step 4: Two Types of WHEELS

The narrow wheels would be the front wheels and the wider wheels would be the back wheels. Then I punched a hole with my pencil in the center of each wheel.
Step 5: Try, Try Again!

I slipped on my wheels and tried them out. My back wheels were too wide. The truck did not run smoothly. The back wheels kept getting stuck on the truck body. So I took the back wheels off and trimmed them. There are the trimmings under the scissor. I had to trim a couple of times until it was just right!
Step 6: Wheel Caps

Here you see that I took the wheels off again to make sure they fit just right. I added caps to the end of the pencil, so the wheels did not fall off. I had lots of little water bottle caps. I poked a hole into the caps with a pen and then pushed a pencil through the hole until it was just right.
Step 7: Designing the Cab

The tea box on top is the cab of the truck. I drew a diagonal line across the front of the tea box and then I cut it off. I made a hood from the cut piece and added aluminum foil headlights and cut a small rectangle from a plastic baggie for the windshield.
I LOVE MY TRUCK!
Step 8: Ready to Roll!

WHAT I LEARNED:
Making vehicles out of boxes is fun!
I had to try again and again to get it to work.
Making wheels is harder that I thought.
Next time, I will create all the body first BEFORE I make the wheels.
I want to make another one! I must start saving more boxes!


Loved the conversation and photos about your process and what you learned.
But my all time favorite was the surprise final photo of the bunny driving the truck!
Thank goodness for your wild imagination, Jojo!!!
LikeLike
This was so creative! How inspirational!
LikeLike
I love the Wonder Lab!! So glad you are still making right now. Thanks for inspiring me!!!
LikeLiked by 1 person
Your first sentence is one I wish I would have written! I like the how-to nature of the words & pictures. Like Molly, I enjoyed the whimsy of the final picture!
LikeLike
I wish I could take “wild mind” as my own – but it is the title of a book by Natalie Goldberg. I saw the book a number of years ago in a little bookstore in Maine and I grabbed it up – like Natalie actually wrote it for me! It is a delight – if you haven’t read it!
LikeLike